DHL carriers are the well-known shipping services all over the world. Sometimes, you may get some customers who will ask for a specific shipping method to get the delivery of their product. However, in Magento 2.0 four default carriers are present and you can configure them to display on checkout page.
We will discuss all the four carriers and their configuration one after the other. So, let us start with DHL carrier first.
The configuration of the DHL carrier can be divided into 4 steps:
- Enable DHL in Magento 2
- Mention package description and handling fees
- Fix the allowed shipping methods
- Determine the Allowed countries for shipping
Let us go through the steps for configuring the shipping method, one by one:
Step 1: Enable DHL in Magento 2.0 store
For applying the DHL carrier in your Magento 2.0 store, you need to first log in to your Magento admin panel. Once you are on the dashboard, navigate to Stores > Configuration > Sales > Shipping Methods > DHL.
The settings will open for DHL carriers, you have to fill up and select the necessary options in the given fields. 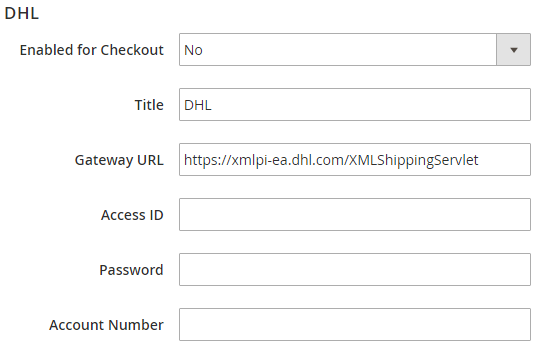
- Select Yes for Enabled for Checkout field to apply DHL on the store.
- In the Title field, mention a name which will appear on checkout for DHL shipping method.
- You can keep the default Gateway URL as it is, to calculate the shipping rate. If you have another URL as an alternative, you can use that in place of this default one.
- In Access ID, Password and Account Number fields, you need to fill up the credentials provided by the DHL carrier services.
Step 2: Mention package description and handling fees 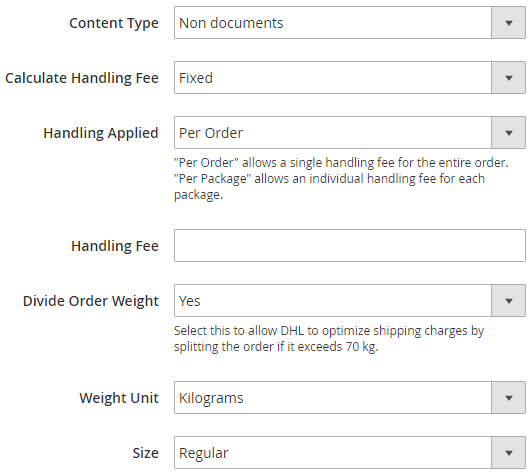
- The packaging description starts with defining the type of contents, which you would like to ship with DHL. In the field of Content Type, you can select any one from the two options: Documents or Non- documents.
- With the following fields, you can set the handling fees of the shipment:
- Calculate Handling Fee: For handling fee calculation, you can select either Fixed or Percent Method.
- Handling Applied: In this field, you have to select how you wish to apply the handling fee i.e. on per order or per package.
- Handling Fee: After selecting the handling method as fixed or percent, you need to mention the fee amount in this field.
- Divide Order Weight: If the weight of your total order is more than 70kgs, then you can use this field to calculate the shipping cost by dividing the order weight. Select Yes to enable the splitting of order weight before calculating the fee.
- Weight Unit: As per your convenience, you can select the unit of weight as Kgs or
- Size: You can set the size of the package by selecting “regular” or “Specific” options in this field. When you are selecting Specific option, you have to mention the Height, Width and Depth of the package in
Step 3: Fix the allowed shipping methods 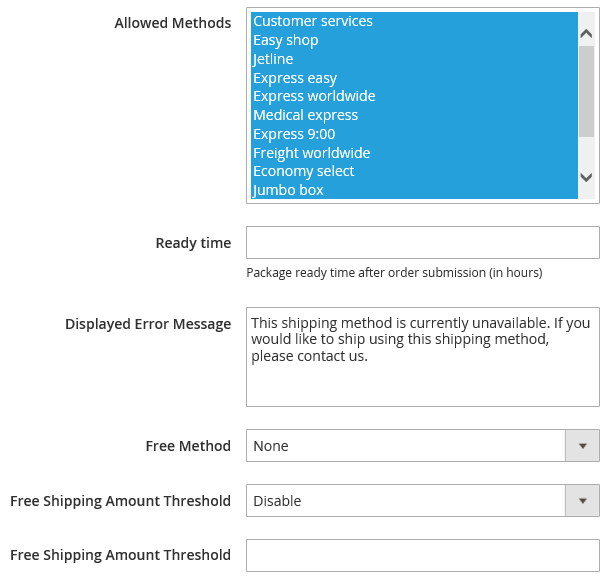
- You can choose the shipping methods which can be allowed on your store with Allowed Methods Press Control and select multiple allowed methods for your store.
- In the Ready time field, you need to enter the number of hours it may take to ship the product after packaging.
- When a customer selects a shipping method which is not applicable, an error message will be displayed to inform them about the same. You can edit that displayed error message
- In the Free Method, you can select the shipping method which you wish to use while offering free shipping.
- With Free shipping amount threshold field, you can enable or disable the free shipping option with a minimum order amount.
- In the next field, you can enter the minimum order amount for the products to qualify for the free shipping.
Step 4: Determine the Allowed countries for shipping 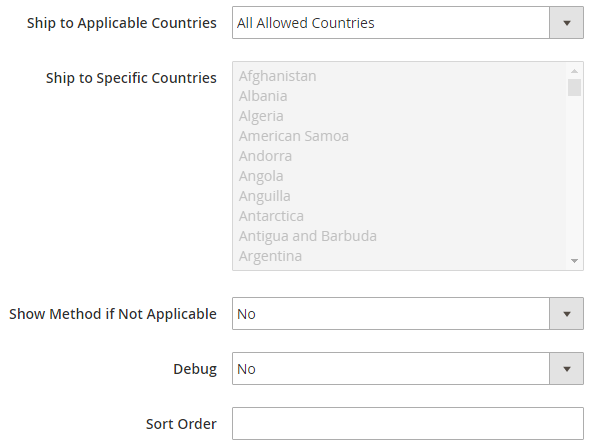
- In Ship to Applicable Countries field, select from All Allowed countries or Specific Countries. This field ensure which countries are covered under DHL shipping method.
- With Show Method if Not Applicable, you can set whether to show the shipping methods when are applicable or not. Here, selecting Yes will display DHL method with error message added in Displayed Error Message field even it is not applicable on that particular order and No will not display DHL if it is not applicable on the order.
- If you wish to create a log file for the DHL carrier details, then set the Debug field to
- With Sort Order, you can specify the order of DHL shipping method on the Checkout page.
With this Step, we come to the end of the Configuration process for DHL carrier in Magento 2.0 store. Just like the DHL carrier configuration, we will discuss and learn the configurations for other major carriers for Magento 2.0 in our coming blogs. So, keep following!
If you have any questions regarding the Magento DHL Integration or if you are facing any issue in any step while configuring the same in your store, please contact our Magento® 2 Developers . We will be happy to help you out!



This is an useful article with such a simple explanation of configuration steps. Thanks for sharing this, Yogesh!
Thanks for your inputs Aiven.
I always wondered how I can implement the DHL carrier shipping method in my Magento 2 store. Thank you for answering my unasked question. Now, I can try to configure this in my store and take the advantages of its features.
Thanks for your reply. We will discuss all the four carriers and their configuration one after the other.I hope you also like this. So, Keep Reading.