This is our tutorial series of Magento 2.0 which is an upgraded and advance version of Magento 1.x. Here, we will publish on various tutorials so that you can easily manage the new back-end by yourself.
So, stay with us to learn Magento 2.0
Now, to manage category you need to go to Admin Panel and follow below steps.
Click on the Product Menu > Select Categories
How to Add New Category
If you want to add root category, click on root category button OR if you want to add sub category for the existing category then first select category from existing list and click add subcategory button. 
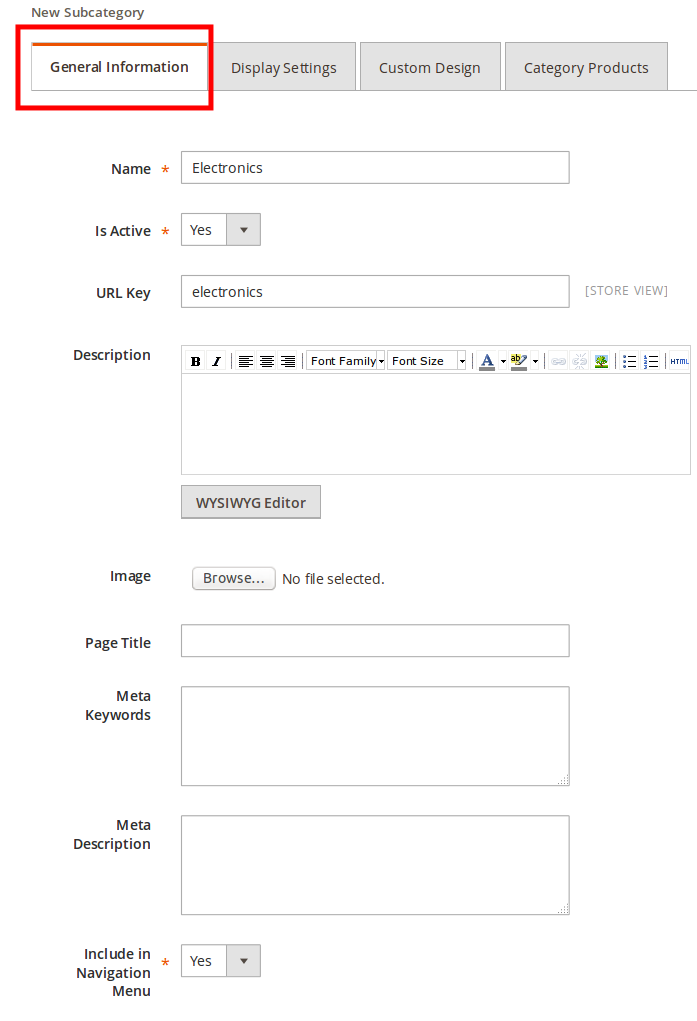
1.1 General Information Tab
For the general Information you need to set up the following parameter.
1.1.1 Name – Give a name to your new category which will be your category name in front-end
1.1.2 Is active – Yes if you want to make Active and No to deactivate
1.1.3 URL Key – If you want to take benefit of SEO, you can fill your own URL key or it will automatically generate based on the category name
1.1.4 Description – Write description of your category for SEO benefit
1.1.5 Page Title – Write SEO title of this category
1.1.6 Meta Keywords – Add Keywords for this category
1.1.7 Meta Description – Write SEO description of this category
1.1.8 Include in the navigation menu – If you want to include this category in the main menu, select Yes or select No
And now SAVE Category
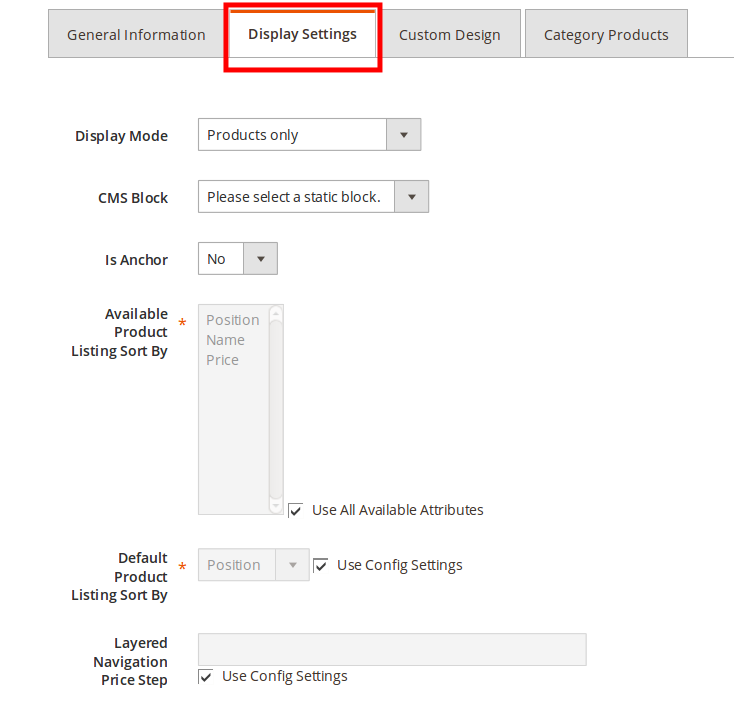
1.2 Display Setting Tab
If you want to show static block content to customers instead of product list under category then you need to set display mode to static block only.
For this tab you need to set up the following parameters
1.2.1 Display Mode – Set Display Mode from Products Only, Static Block Only or Static Block and Products
1.2.2 CMS Block – Choose CMS block from the list
1.2.3 In Anchor – Select Yes or No
1.2.4 Available Product Listing Sort by – Uncheck the check box and select suitable option to short by
1.2.5 Default Product Listing Sort by – Same uncheck the check box and select one of them
1.2.6 Layered Navigation Price Step – Enter price step
And now SAVE Category
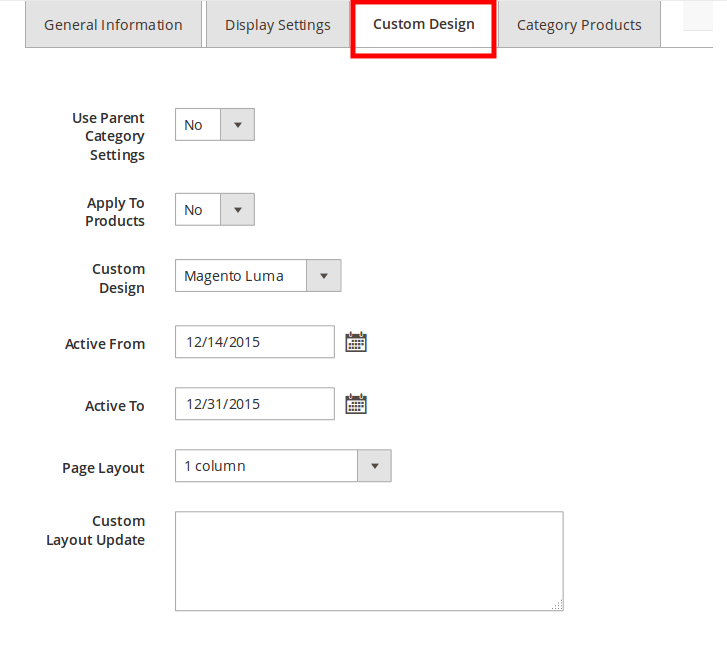
1.3 Custom Design Tab
This tab is used to set layout of the current category that how category page will look like in store front.
1.3.1 Use Parent Category Settings – Select either Yes or No. Parent category of this category has already been customized and you want to use same settings then select Yes or else No.
1.3.2 Apply to Products – Select yest if you want to apply custom setting to all products or else select No.
1.3.3 Custom Design – Select from all available themes or select blank theme
1.3.4 Active from – Choose time frame from
1.3.5 Active to – Choose time frame to
1.3.6 Page Layout – Choose the layout of this page such as 1 column, 2 column, No layout
1.3.7 Custom Layout Update – You can skip this if you have not selected Page Layout
And now SAVE Category
1.4 Category Tab
This tab is used to display products that you want to display in this current category.
And now SAVE Category
Make sure that you just need to fill-up General info tab only. The rest are all optional. Once you are done, click on save button. Also, in order to show up newly created category, do not forget to clear your cache.
Haven’t upgraded to Magento 2 yet? Find out should you upgrade to Magento 2 or not or talk to our experienced Magento consultants about your queries.







i want to diasply category on product list page magento 2?